Objective:
This post will explain you about, how to capture use login, logout and session out time in Oracle APEX applications using security attributes.
Section
1:
To Capture User Login Details:
User
Log Reports provides the detailed information about the users' login details
along with their history. These reports are more accurate and also provides the
details of the user, their logon time, logoff time, the computer from which
they logged on, the domain controller they reported, etc., along with their
logon history. It also provides the details of Currently Logged On Users
and Frequently Logged-on Users.
The
following information can be captured in the Database.
1.
Login Date
2.
Login Time
3.
Session Id
4.
System IP Address
5.
Host Name
6.
User Name
Step
1: Table Creation.
<<table_name>>
(column_names) {Based on the column Requirement}
Step
2: Creation of Page Hidden Items.
Create
Page Hidden Items P0_SESSION_ID, P0_USER_ID for getting Session id as well as
User id.
P0_SESSION_ID:
SELECT
v ('session')
FROM dual;
Step
3: Creation of Insertion Process in the User Login Page.
On
Click of Login Button or Enter Button in Login Page the following process has
to be created.

Insertion Process:
DECLARE
ln_session_id NUMBER;
lv_ip_address VARCHAR2 (30);
lv_login_date VARCHAR2 (100);
lv_login_time VARCHAR2 (50);
lv_user_role VARCHAR2 (50);
lv_current_schema VARCHAR2 (50);
lv_host VARCHAR2 (50);
BEGIN
-- Select Session id,Login Date,Login Time, Ip Address, Host name and Current
Schema
BEGIN
SELECT v ('session'),
TO_CHAR (SYSDATE, 'dd-Mon-yyyy'),
TO_CHAR (SYSDATE, 'hh12:mi:ss PM'),
sys_context ('USERENV', 'IP_ADDRESS'),
sys_context ('USERENV', 'HOST'),
sys_context ('USERENV', 'CURRENT_SCHEMA'),
INTO ln_session_id,
lv_login_date,
lv_login_time,
lv_ip_address,
lv_host,
lv_current_schema
FROM dual;
EXCEPTION
WHEN OTHERS THEN
raise_application_error (-20001, 'Error on Selecting Session Id' ||
sqlerrm );
END;
-- Select the User Role
BEGIN
SELECT user_role
INTO lv_user_role
FROM homes_fnd_users
WHERE user_id = :p0_user_id;
EXCEPTION
WHEN OTHERS THEN
raise_application_error (-2007, 'Error on Selecting User Name' ||
sqlerrm );
END;
-- Insert Data to Corresponding Table
BEGIN
INSERT
INTO homes_inv_user_log_details
(
session_id,
user_role,
user_name,
CURRENT_SCHEMA,
host,
log_id,
login_date,
login_time,
ip_address
)
VALUES
(
ln_session_id,
lv_user_role,
:p0_user_id,
lv_current_schema,
lv_host,
homes_log_details.nextval,
lv_login_date,
lv_login_time,
lv_ip_address
);
EXCEPTION
WHEN OTHERS THEN
raise_application_error (-20006, 'Error on While Inserting records' ||
sqlerrm );
END;
END;
Step
4: Interactive Report Creation. Create a new page
with Interactive Report that shows all the Login Details.
Output:

Section 2:
To Capture User Logout Details:
The
following information will be captured in the Database.
1.
Logout Date
2.
Logout Time
3.
Session Id
4.
System IP Address
5.
Host Name
6.
User Name
Step
1: Creation of New Image.
Upload
designed or downloaded images to Apex Workspace.
Step
2: Button Creation
In
Edit Page remove Navigation Bar Entry Label, instead create a new Button in the
Global Page (Zeroth Page) in your Apex Application.
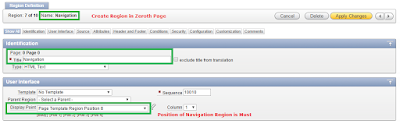
1. Now create a new Region (Template=> No Template &
Display Point => Page Template Region Position 8)
2. Create new Buttons (which is used in application) in
this Region only. This Button will be displayed throughout the application.
3. Change the button style => Images.
4. Call the image from Apex Workspace,
#WORKSPACE_IMAGES#<<workspaceimage_name>>
Region
Creation:
Button Creation:
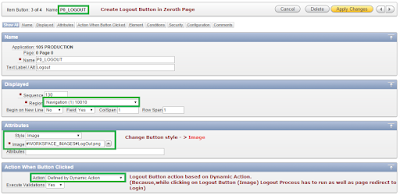
Navigation Bar Logout:
Set
Navigation Bar Logout Condition as NEVER.
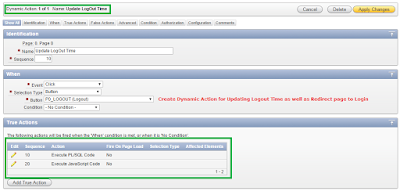
Step
3: Creation of Dynamic Action
Since
it is not possible to create a Process in Global Page, so create a dynamic
action.
1.
Execute PLSQL Code:
Create
the following action On Click of Logout Button.
DECLARE
lv_logout_date VARCHAR2 (100);
lv_logout_time VARCHAR2 (100);
BEGIN
-- Select Logout Date and Logout Time
BEGIN
SELECT to_char (SYSDATE, 'dd-Mon-yyyy'),
to_char (SYSDATE, 'hh12:mi:ss PM')
INTO lv_logout_date,
lv_logout_time
FROM dual;
exception
WHEN others THEN
raise_application_error (-20001, 'Error on Selecting Logout Date &
Time' || sqlerrm );
END;
--Update Logout Date and Logout Time
BEGIN
UPDATE homes_inv_user_log_details
SET logout_date = lv_logout_date,
logout_time = lv_logout_time
WHERE session_id = :p0_session_id;
exception
WHEN others THEN
raise_application_error (-20003, 'Error on Updating Records' || sqlerrm
);
END;
END;
/
2.
Execute Java script Code:
window.location='&LOGOUT_URL.'
Step 4: Create a new page with Interactive Report that
shows all the Login Details.
Output:

Section 3:
Session Out Time Capture:
Paste
the below code into SECURITY ATTRIBUTES = > DATABASE SESSION.
Execute
PLSQL Code:
BEGIN
--Select Session Out Date & Session Out Time
BEGIN
SELECT TO_CHAR (SYSDATE, 'dd-Mon-yyyy'),
TO_CHAR (SYSDATE, 'hh12:mi:ss PM')
INTO lv_session_date,
lv_session_time
FROM dual;
EXCEPTION
WHEN OTHERS THEN
raise_application_error (-20001, 'Error on Selecting Logout Date' ||
sqlerrm );
END;
-- Update Session Out Date & Session Out Time When Session is Out
BEGIN
UPDATE homes_inv_user_log_details
SET session_date = lv_session_date,
session_time = lv_session_time
WHERE session_id = :p0_session_id;
EXCEPTION
WHEN OTHERS THEN
raise_application_error (-20003, 'Error on Updating Records' || sqlerrm
);
END;
END;
Output:
Comments
Post a Comment