select * from apex_dictionary
Objective:
To modify you oracle apex application login page as per your imagination.


Fig 1: Actual Login Page
Step 1: Go to shared components => Static or Application files and upload required image.
Design 1:
Just add below CSS in inline CSS option in page header.
.t-PageBody--login .t-Body { background-image: url(#APP_IMAGES#highway_dubai-1000x600.jpg); background-size: 100% auto; } .t-Login-header { display: none; } .t-Login-header { display: none; } .t-Login-container { float: right; margin-right: 2%; top: 0px; right: 0; position: absolute; } .t-Login-region { box-shadow: none; padding: 20px 15px 10px 15px; width: 67%; float: right; margin-top: 70px; background: rgba(255, 255, 255, 0.59); border-radius: 17px; } .t-Button--hot { font-family: Poppins-Regular; font-size: 15px ; width: 60% ; margin-left: 20% ; padding: 13px 24px ; background: #ec5e66 ; font-weight: normal ; border-radius: 10px; } .t-Alert { top: 10px ; position: absolute ; left: inherit ; }
Output:
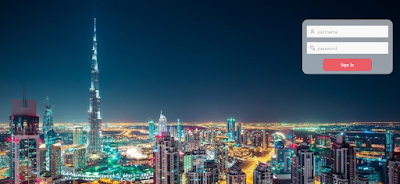
Fig 2: Custom Login Page
Design 2:
Just add below CSS in inline CSS option in page header.
.appIcon.sample_ig { background-position: -192px -192px; } .appIcon { display: inline-block; width: 64px; height: 64px; background-repeat: no-repeat; border: none; -webkit-border-radius: 4px; -moz-border-radius: 4px; border-radius: 4px; -webkit-box-shadow: 0 0 1px rgba(0, 0, 0, 0.75) inset; -moz-box-shadow: 0 0 1px rgba(0, 0, 0, 0.75) inset; box-shadow: 0 0 1px rgba(0, 0, 0, 0.75) inset; margin-right: 8px; vertical-align: middle; } span.t-Login-logo { backgroung-size: cover; width: 50px; height: 50px; } .t-PageBody--login .t-Body { background-image: url(#APP_IMAGES#highway_dubai-1000x600.jpg); background-size: 100% auto; } .t-Login-region { box-shadow: none; padding: 20px 15px 10px 15px; float: right; width: 100%; background: rgba(255, 255, 255, 0.59); border-radius: 17px; }
Output:

Design 1:
Just add below CSS in inline CSS option in page header.
.t-PageBody--login .t-Body { background-image: url(#APP_IMAGES#highway_dubai-1000x600.jpg); background-size: 100% auto; } .t-Login-header { display: none; } .t-Login-header { display: none; } .t-Login-container { float: right; margin-right: 2%; top: 0px; right: 0; position: absolute; } .t-Login-region { box-shadow: none; padding: 20px 15px 10px 15px; width: 67%; float: right; margin-top: 70px; background: rgba(255, 255, 255, 0.59); border-radius: 17px; } .t-Button--hot { font-family: Poppins-Regular; font-size: 15px ; width: 60% ; margin-left: 20% ; padding: 13px 24px ; background: #ec5e66 ; font-weight: normal ; border-radius: 10px; } .t-Alert { top: 10px ; position: absolute ; left: inherit ; }
Output:
Fig 2: Custom Login Page
Just add below CSS in inline CSS option in page header.
.appIcon.sample_ig { background-position: -192px -192px; } .appIcon { display: inline-block; width: 64px; height: 64px; background-repeat: no-repeat; border: none; -webkit-border-radius: 4px; -moz-border-radius: 4px; border-radius: 4px; -webkit-box-shadow: 0 0 1px rgba(0, 0, 0, 0.75) inset; -moz-box-shadow: 0 0 1px rgba(0, 0, 0, 0.75) inset; box-shadow: 0 0 1px rgba(0, 0, 0, 0.75) inset; margin-right: 8px; vertical-align: middle; } span.t-Login-logo { backgroung-size: cover; width: 50px; height: 50px; } .t-PageBody--login .t-Body { background-image: url(#APP_IMAGES#highway_dubai-1000x600.jpg); background-size: 100% auto; } .t-Login-region { box-shadow: none; padding: 20px 15px 10px 15px; float: right; width: 100%; background: rgba(255, 255, 255, 0.59); border-radius: 17px; }
Output:
Fig 3: Custom Login Page
Comments
Post a Comment