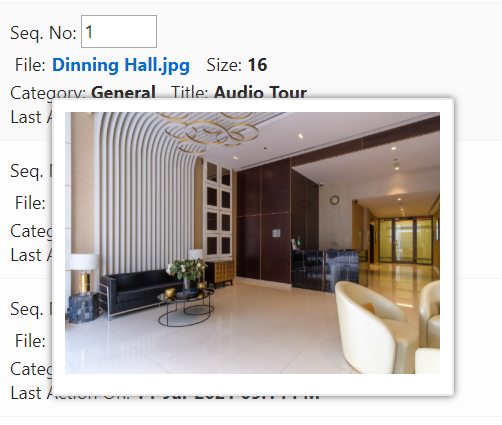
I have built this tool-tip with image feature for one of my customer and they were very happy about it, So here I am giving an elegant way for adding tool-tip with image in Oracle APEX Report using Jquery.
Tool-tip: The tool-tip, also known as info tip or hint, is a common graphical user interface element in which, when hovering over a screen element or component, a text box displays information about that element (such as a description of a button's function, or what an abbreviation stands for). The tool tip is displayed continuously as long as the user hovers over the element.
Step 1: Create table and populate some sample records.
CREATE TABLE fxgn_documents (document_id NUMBER PRIMARY KEY,
sequence_no NUMBER,
file_name VARCHAR2(240),
file_url VARCHAR2(4000),
updated_by VARCHAR2(240),
updated_on TIMESTAMP);
INSERT INTO fxgn_documents VALUES (1, 1, 'Image 1', :p_img_url,'Admin',LOCALTIMESTAMP);
INSERT INTO fxgn_documents VALUES (2, 2, 'Image 2', :p_img_url,'Admin',LOCALTIMESTAMP);
INSERT INTO fxgn_documents VALUES (3, 3, 'Image 3', :p_img_url,'Admin',LOCALTIMESTAMP);
INSERT INTO fxgn_documents VALUES (4, 4, 'Image 4', :p_img_url,'Admin',LOCALTIMESTAMP);
INSERT INTO fxgn_documents VALUES (5, 5, 'Image 5', :p_img_url,'Admin',LOCALTIMESTAMP);
INSERT INTO fxgn_documents VALUES (6, 6, 'Image 6', :p_img_url,'Admin',LOCALTIMESTAMP);
COMMIT;
Step 2: Function Call: Create a function tooltip_with_image. If you want to render it in multiple places, it would be good practice to put this code in a package and call it in your query.
Sample function in a package called fxgn_general.
create or replace FUNCTION tooltip_with_image(
p_img_id NUMBER,
p_img_name VARCHAR2,
p_img_link VARCHAR2,
p_img_width NUMBER,
p_img_height NUMBER )
RETURN CLOB
AS
l_return CLOB;
BEGIN
l_return := '<!doctype html>
<html lang="en">
<head>
<meta charset="utf-8">
<meta name="viewport" content="width=device-width, initial-scale=1">
<link rel="stylesheet" href="//code.jquery.com/ui/1.12.1/themes/base/
jquery-ui.css">
<script src="https://code.jquery.com/jquery-1.12.4.js"></script>
<script src="https://code.jquery.com/ui/1.12.1/jquery-ui.js"></script>
<script>
$(document).ready(function() {
$("#content_'||p_img_id||'").html(''<a id="data_'||p_img_id||'"
href="#" title="">'||p_img_name ||'</a>'');
$("#content_'||p_img_id||' #data_'||p_img_id||'").tooltip({ content:
''<img src="'||p_img_link||'" style="width:'||nvl(p_img_width,250)||
'px; height:'||nvl(p_img_height,175)||'px;" />''});
});
</script>
</head>
<body>
<div id="content_'||p_img_id||'">
</div>
</body>
</html>';
RETURN l_return;
END tooltip_with_image;
This function has 5 parameters,
p_img_id - Primary key field value.
p_img_name - Name of the image, that will be displayed as field value in the report.
p_img_link - It will be displayed in the tool-tip as image.
p_img_width - To adjust the width of the image.
p_img_height - To adjust the height of the image.
Step 3: Create a new blank page.
Note: Mine was page 10. You will need to update reference to "P10" with your page number if it's different.
Step 4: Create a "Classical Report" region to the page using below script. (You can use any of the reports)
SELECT sequence_no,
fxgn_general.tooltip_with_image (sequence_no, file_name, file_url, 250, 175)
AS file_name,
updated_by,
updated_on
FROM fxgn_documents
ORDER BY sequence_no ASC;


References:
Mobile app developmenthas become a big line of business for companies that want to get a foothold in the tech world. While there are some companies that have succeeded solely on their own, most of the successful ones have relied on outside help. Some of the top mobile app development companies are able to provide services at a low cost, which is appealing in an industry where customers reconsider their purchases with increasing frequency.Having a strong mobile app can help you get customers, and keep them coming back to you.
ReplyDeleteDo you need financing to renovate your house or to carry out your various projects? Fast and reliable in the short and long term at a rate of 3%. For more details: contact us directly by financialserviceoffer876@gmail.com WhatsApp +918929509036
ReplyDelete