Couple of days before, my client asked me to bring an action menu in interactive report instead of bringing multiple icons (buttons) in each row. I searched in google and found excellent blog post from John Snyders, where he explained the steps to bring custom action menu in oracle apex interactive report is amazing. He has done his job with lots of love. I tried his solution and it worked.
Here I am giving an example to create custom menus in Oracle apex interactive report using JavaScript.
This demo consists of 3 pages. The main page (page 1) is an Interactive Report showing the departments from the eba_demo_chart_dept table. The report includes an Actions column with a menu button in it. This means there is a menu button in each row and the actions in that menu are specific to the department in the row.
Opening the menu gives you the option to Edit the department in a modal dialog page (page 3) or go to an employee report page (page 2) that shows all the employees from the eba_demo_chart_emp table in that department.
The ACCOUNTING department has the Edit menu item disabled.
Create a interactive report region to the page 1 using below query.
SELECT edcd.deptno,
edcd.dname,
edcd.loc,
CASE WHEN edcd.deptno = 10
THEN 'Y'
ELSE 'N'
END AS LOCKED,
trim( BOTH '''' FROM regexp_substr( apex_util.prepare_url( 'f?p='
|| v('APP_ID')
|| ':3:'
|| v('APP_SESSION')
|| '::NO::P3_DEPTNO:'
|| edcd.deptno ), '''f\?p=[^'']*''')) AS edit_link
FROM eba_demo_chart_dept edcd
The LOCKED column will be used to control the disabling of menu items. You will have your own business rules.
The EDIT_LINK to extract the dialog URL. It calls PREPARE_URL with the desired URL that includes the DEPTNO page item value. It then uses a regular expression to extract the URL and then strips off the single quotes.
LOCKED and EDIT_LINK columns are both hidden as the values are only needed in the Actions column.
The DEPTNO select column is the report Actions column and uses the following HTML Expression.
<div class="report-actions">
<button type="button" class="t-Button t-Button--icon t-Button--noLabel js-menuButton"
data-menu="actionsMenu" aria-label="Actions" title="Actions"
data-id="#DEPTNO#" data-link="#EDIT_LINK#" data-title="#DNAME#"
data-locked="#LOCKED#"><span aria-hidden="true"
class="fa fa-bars a-icon"></span><span aria-hidden="true"
class="fa fa-chevron-down"></span></button>
</div>
To create the menu, the following code to be added to the page Execute when Page Loads attribute.
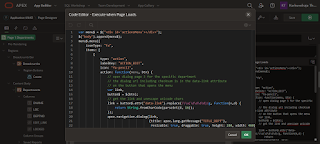
var menu$ = $("<div id='actionsMenu'></div>");
$("body").append(menu$);
menu$.menu({
iconType: "fa",
items: [
{
type: "action",
labelKey: "ACTION_EDIT",
icon: "fa-pencil",
action: function(menu, btn) {
// open dialog page 3 for the specific department
// the dialog url including checksum is in the data-link attribute
// on the button that opens the menu
var link,
button$ = $(btn);
// get the link and unescape unicode chars
link = button$.attr("data-link").replace(/\\u(\d\d\d\d)/g,
function(m,d) {
return String.fromCharCode(parseInt(d, 16));
});
apex.navigation.dialog(link,
{title: apex.lang.getMessage("TITLE_DEPT"),
resizable: true, draggable: true, height: 280,
width: 460},
"t-Dialog--standard",
button$);
},
disabled: function() {
var btn$ = $("button.is-active.js-menuButton");
return btn$.attr("data-locked") === "Y";
}
},
{
type: "action",
labelKey: "ACTION_EMP",
icon: "fa-users",
action: function(menu, btn) {
// go to the employee page (2) for the specific department
var btn$ = $(btn);
apex.navigation.redirect(apex.util.makeApplicationUrl({
pageId:2,
itemNames: ["P2_DEPTNO", "P2_TITLE"],
itemValues: [btn$.attr("data-id"), btn$.attr("data-title")]
}));
}
}
]
});
[Create Text Messages] Go to Shared Component => Text Messages with Used in JavaScript set to Yes. In the demo app I created the following text messages.
Download and import the Custom Menu Demo App in your work space.
Output:
That's it.
Happy APEXing!!!...
Reference/Credits:


This is really a much needed one for us.
ReplyDeleteIndeed
Delete