
Fig 1: Multiple Columns Popup LOV
Here I am giving an elegant way for displaying multiple columns in Oracle APEX Popup LOV. This has been inspired by Oracle E-Business Suite.
List of Values: A List of Values is a static or dynamic definition used to display a specific type of page item, such as popup lists of values, a select list, a check box, a radio group, or multiple select lists.
Step 1: Keep your LOV query ready.
SELECT emp.ename employee,
emp.empno,
dept.dname department,
emp.job,
mgr.ename manager,
to_char(emp.hiredate,'DD-Mon-RRRR') hire_date,
to_char((nvl(emp.sal,0) + nvl(emp.comm,0)), '999G999G999G999G990D00')
AS total_salary
FROM eba_demo_chart_emp emp,
eba_demo_chart_emp mgr,
eba_demo_chart_dept dept
WHERE 1 = 1
AND emp.mgr = mgr.empno
AND emp.deptno = dept.deptno
ORDER BY emp.ename ASC;
Step 2: Create List of Values (LOV)
Navigation: Application ==> Shared Components ==> Lists of Values ==> Create
I) Source: Below popup comes up, when the button Create clicked. Choose option "From Scratch".

Screen 1: Source
And click on Next >, It will navigate to Screen 2 (Name and Type),
II) Name and Type:
Enter name and select the type of LOV (Dynamic/Static).
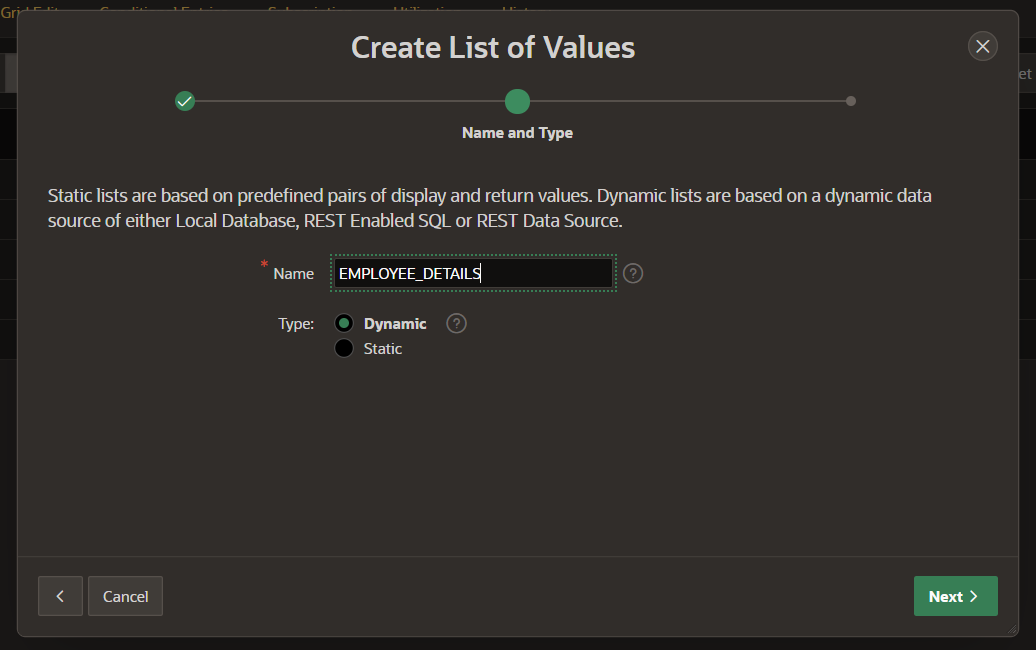
Screen 2: Name and Type
Note:
Static lists are based on predefined pairs of display and return values.
Dynamic lists are based on a dynamic data source of either Local Database, REST Enabled SQL or REST Data Source.
Click on Next >, It will navigate to Screen 3 (List of Values Source),
III) List of Values Source:
Select data source as local database and source type as SQL Query.
To populate the list of values, copy and paste a SQL Query (which we created earlier) into SQL window.

Screen 3: List of Values Source
Note:
Generally list of value queries are of the form:
SELECT [displayValue],
[returnValue]
FROM ...
WHERE ...
ORDER BY ...
Each column selected must have a unique name or alias. Oracle recommends using an alias on any column that includes an SQL expression.
Click on Next >, it will navigate to below Screen 4 (Column Mappings),
IV) Column Mappings:
Return Column: Define the return column that will be used as return value of the List of Values.
Display Column: Define the display column that will be used as display value of the List of Values.

Screen 4: Column Mappings
LOV (EMPLOYEE_DETAILS) will be created when button Create clicked.

Fig 2: List of Values List
V) Queries Defined with Multiple Columns:
When creating List of Values based on a SQL Query with more than 2 columns, if you wish to display these additional columns in an item that supports it (for example the Popup LOV), you will need to explicitly add them after creating the LOV.
To do so, go to the edit page, and then in "Additional Display Columns", select "Select Columns" where you can select additional columns to display.
For item types that do not support multiple columns, these will be ignored. If adding additional display columns ensure that the return column is included in the column list. The return column can be set to Visible No and Searchable No if you do not want it displayed to users.

Fig 3: Select Additional Display Columns
Note: Fields which are all on the right side window will be displayed.

Fig 4: List of Selected Columns and it's Details
Click on Apply Changes to commit the changes.

Fig 5: Apply Changes
Step 3: Create a new blank page.
Note: Mine was page 26. You will need to update reference to "P26" with your page number if it's different.
Step 4: Create a new static region to the page.
Step 5: Create a new item to the region.
Step 6: Set name to P26_EMPLOYEE and change the type as Popup LOV. An option "Search as You Type" should be enabled.

Fig 6: Item Identification
Merits:
1) Can change the popup width and height
2) Can give the title of the LOV (Title will be displayed, if Popup LOV display type as Modal Dialog)
3) Can allow multiple values
4) Can set the characters.
Step 7: Assign LOV to the item (P26_EMPLOYEE).

Fig 7: Item Setting
That's it.
Output: Then your output would then display like this,
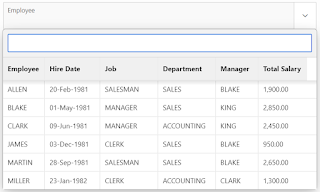
Fig 8: List of Values
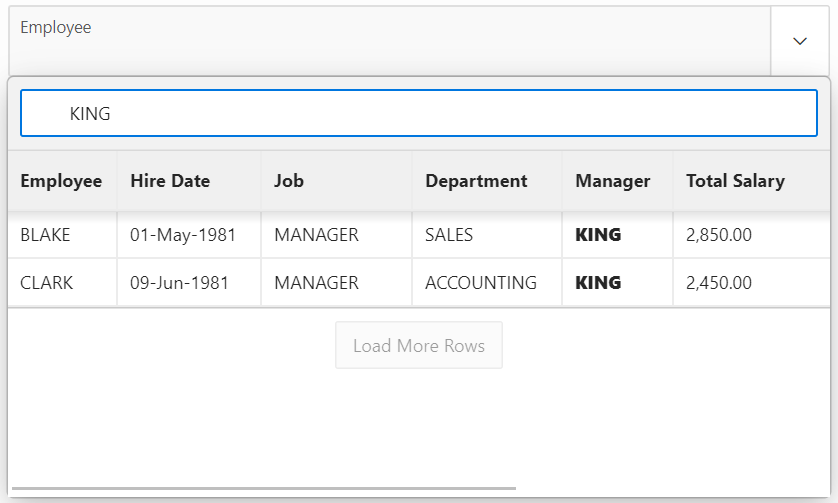
Fig 9: List of Values - Search Feature

Fig 10: Value Selected
The demo is here.
Happy APEXing!!!...
References:
i need to show multiple column when i choose lov type sql. is there any way?
ReplyDeleteThanks for sharing these ideas about using marble in interior design.baroque architecture Austria
ReplyDeleteneoclassical columns
imperial stone facades
Vienna building restoration
historic column designs
Zogelsdorf limestone
architectural heritage Austria
facade renovation Vienna
ornamental pillars
Austrian stonemasonry