
The objective of this blog post is to show you how to integrate Razorpay Payment Gateway with Oracle APEX.
What is Razorpay?
Razorpay is the only converged payments solution company in India that allows your business to accept, process, and disburse payments via its product suite. With Razorpay, you have access to all payment modes, including credit and debit cards, UPI, and popular mobile wallets.
Razorpay Payment Gateway Integration with Oracle APEX 20.x
Below are the steps involved to get this process done.
1) Create a Razorpay Account
2) Get Razorpay API Keys in Test Mode
3) Get and Invoke Razorpay Orders API with Postman
4) Create a required Database Objects
5) Create a Sample Oracle APEX Application
6) Invoke Razorpay Payment Gateway using APEX_WEB_SERVICE API (Payment Process)
7) Verify Payment Status
8) Setup REST End Point to Receive Razorpay Webhook Response
9) Setup Razorpay Webhook
10) Test Card
I) Create a Razorpay Account
II) Get Razorpay API Keys in Test Mode
API key is a combination of the key_id and key_secret and is required to make any API request to Razorpay. You also have to implement the API key in your code as part of your integration process.
Step 2: Select the mode (Test or Live) which you want to generate the API Key.
Select Test Mode. Once you are done with the integration, you can generate Live Mode API Keys and replace them in the integration
Step 3: Navigate to Settings --> API Keys --> Generate Key to generate key for the selected mode.
The key_id and key_secret appear on a pop-up page.

III) Get and Invoke Razorpay Orders API with Postman
Step 1: You can get Razorpay Order API by clicking this link.

Step 2: Setup Body (JSON)

Step 3: Setup Authorization (Basic Authentication) and click "Send" button to call the API.
Username: API Key Id
Password: API Key Secrete

Note: When status code is between 200 and 299, then API is working fine.
IV) Create a required Database Objects
Step 1: You can download and compile required database objects from Github.
Step 2: Go to SQL Workshop --> SQL Scripts --> Upload to upload the script.
%20Object%20Creation.PNG)
V) Create a Sample Oracle APEX Application
VI) Invoke Razorpay Payment Gateway from Oracle APEX Application (Payment Process)
We will be using Hosted Checkout Integration (Payment Data will be managed by Razorpay). For more information please refer to this link.
Step 1: Create a sample page like below screenshot.
Step 2: Create a dynamic action and It should be triggered on "Send" button call.
Step 3: Call the procedure "fmgn_rzp_integration.create_rzpay_order" by passing payment amount and receipt number, in the dynamic action true action.
This procedure, will call the Razorpay orders API and return Order Information.
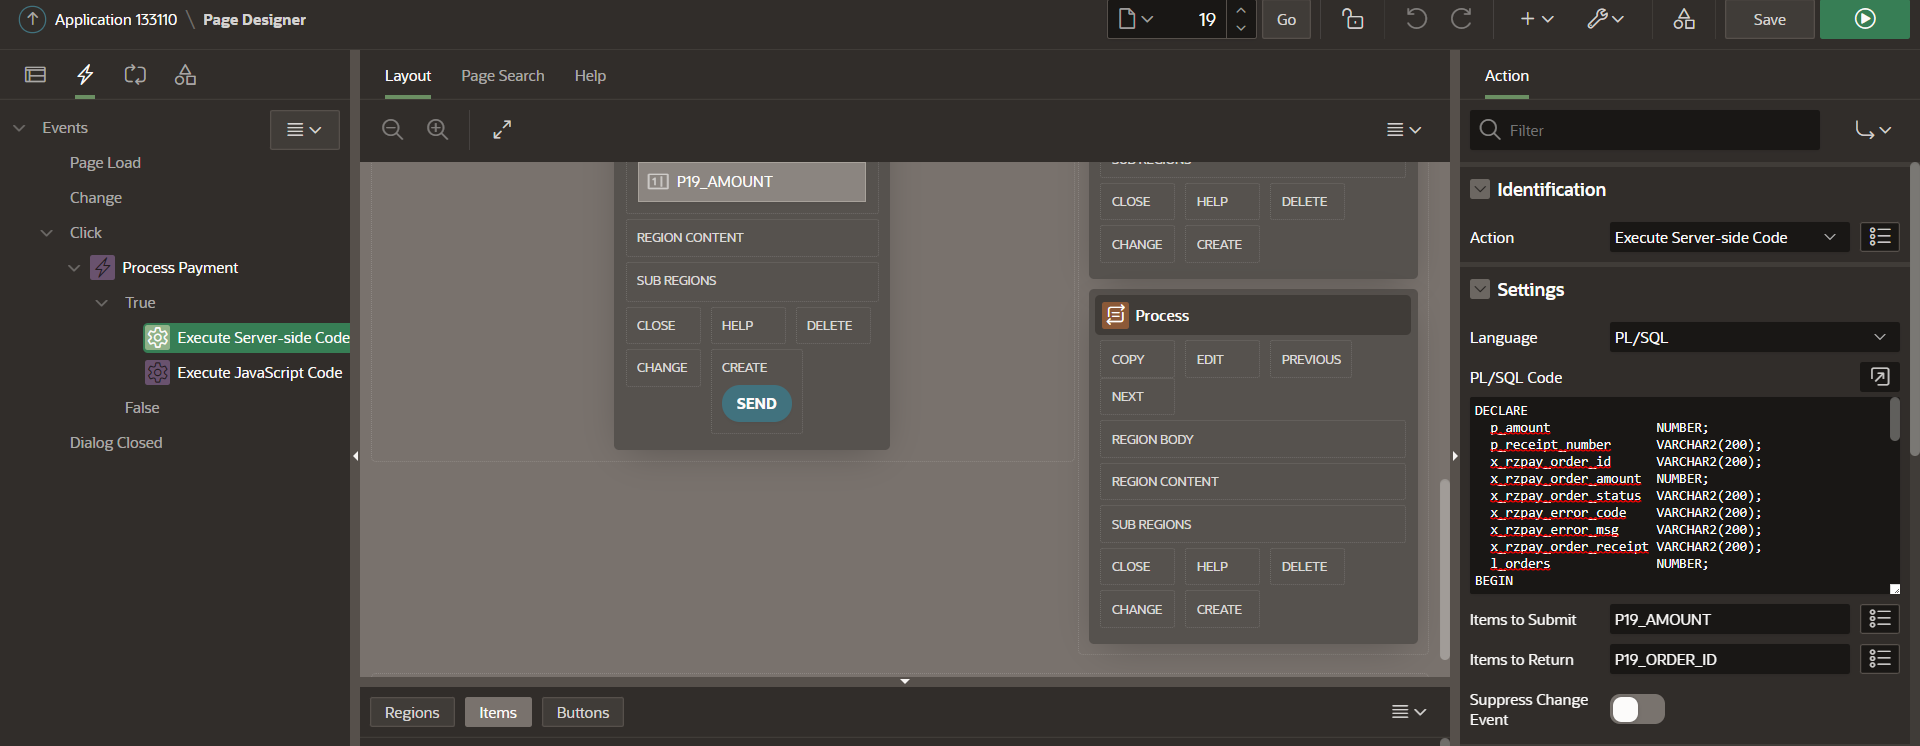
DECLARE
p_amount NUMBER;
p_receipt_number VARCHAR2(200);
x_rzpay_order_id VARCHAR2(200);
x_rzpay_order_amount NUMBER;
x_rzpay_order_status VARCHAR2(200);
x_rzpay_error_code VARCHAR2(200);
x_rzpay_error_msg VARCHAR2(200);
x_rzpay_order_receipt VARCHAR2(200);
BEGIN
SELECT COUNT(rzp_id)
INTO l_orders
FROM fmgn_rzp_orders;
p_amount := :P19_AMOUNT;
p_receipt_number := 'receipt#'||l_orders;
fmgn_rzp_integration.create_rzpay_order ( p_amount => p_amount,
p_receipt_number => p_receipt_number,
x_rzpay_order_id => x_rzpay_order_id,
x_rzpay_order_amount => x_rzpay_order_amount,
x_rzpay_order_status => x_rzpay_order_status,
x_rxpay_error_code => x_rzpay_error_code,
x_rzpay_error_msg => x_rzpay_error_msg,
x_rzpay_order_receipt => x_rzpay_order_receipt
);
:P19_ORDER_ID := x_rzpay_order_id;
dbms_output.put_line('X_RZPAY_ORDER_ID = ' || x_rzpay_order_id);
dbms_output.put_line('X_RZPAY_ORDER_AMOUNT = ' || x_rzpay_order_amount);
dbms_output.put_line('X_RZPAY_ORDER_STATUS = ' || x_rzpay_order_status);
dbms_output.put_line('X_RZPAY_ERROR_MSG = ' || x_rzpay_error_msg);
dbms_output.put_line('X_RZPAY_ORDER_RECEIPT = ' || x_rzpay_order_receipt);
END;
/
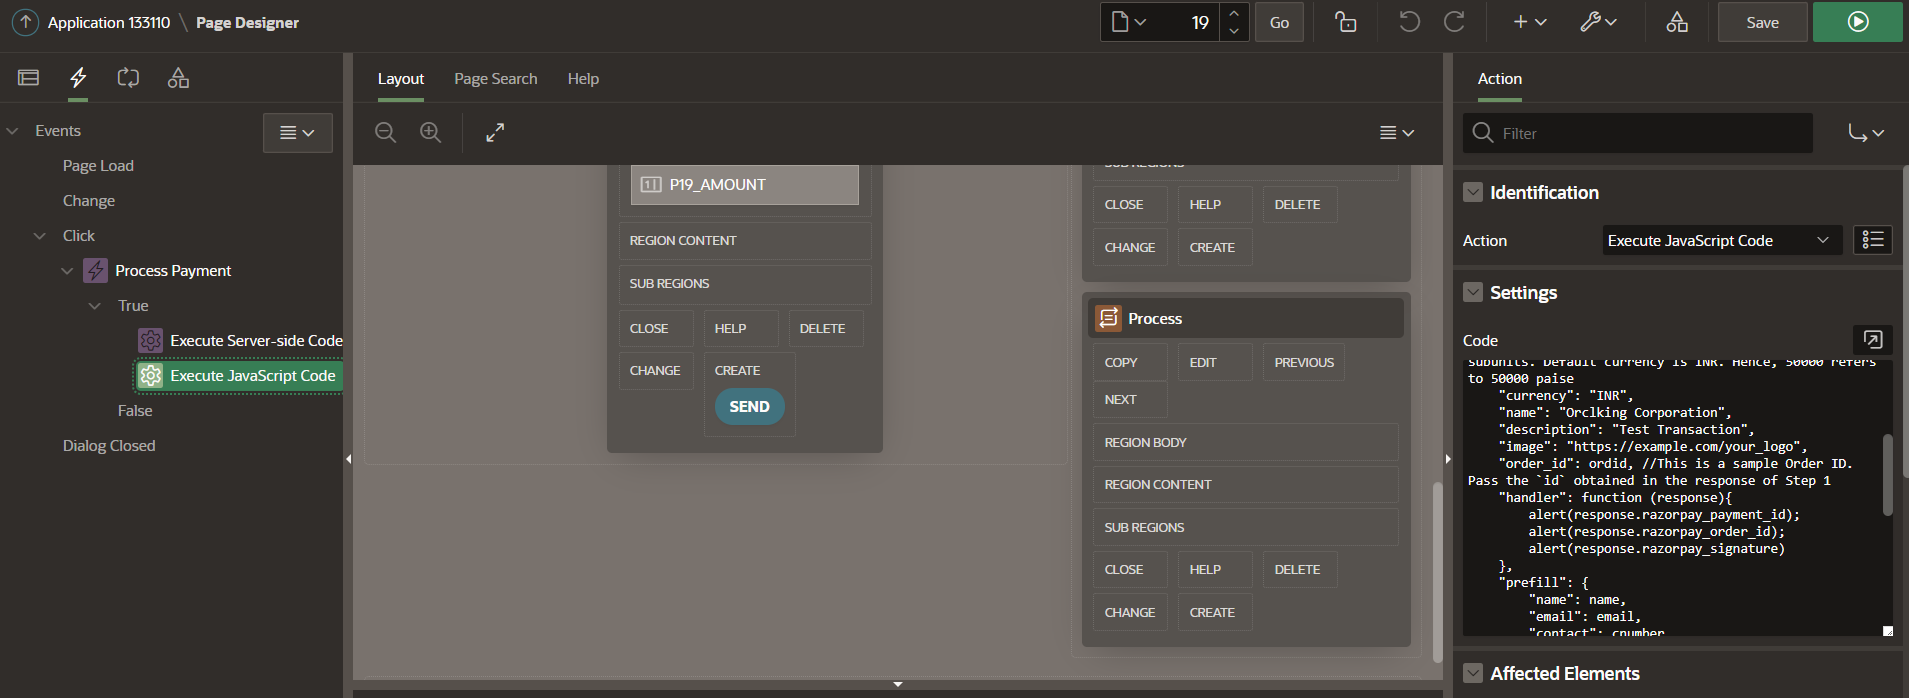
Step 4: Then add some JavaScript Code to call Razorpay provided payment Widget then Put your Test Card Number (available in Razorpay Account) for creating Test Transaction.
var ordid = $v('P19_ORDER_ID');
var amount = $v('P19_AMOUNT');
var name = $v('P19_NAME');
var email = $v('P19_EMAIL');
var cnumber = $v('P19_MOBILE_NUMBER');
//alert (ordid);
//alert (amount);
//alert (name);
//alert (email);
//alert (cnumber);
var options = {
"key": "<<YOUR RAZORPAY API KEY>>", // Enter the Key ID generated from the Dashboard
"amount": amount, // Amount is in currency subunits. Default currency is INR. Hence, 50000 refers to 50000 paise
"currency": "INR",
"name": "Orclking Corporation",
"description": "Test Transaction",
"image": "https://example.com/your_logo",
"order_id": ordid, //This is a sample Order ID. Pass the `id` obtained in the response of Step 1
"handler": function (response){
//alert(response.razorpay_payment_id);
//alert(response.razorpay_order_id);
//alert(response.razorpay_signature)
},
"prefill": {
"name": name,
"email": email,
"contact": cnumber
},
"notes": {
"address": "Razorpay Corporate Office"
},
"theme": {
"color": "#3399cc"
}
};
var rzp1 = new Razorpay(options);
rzp1.on('payment.failed', function (response){
//alert(response.error.code);
//alert(response.error.description);
//alert(response.error.source);
//alert(response.error.step);
//alert(response.error.reason);
//alert(response.error.metadata.order_id);
//alert(response.error.metadata.payment_id);
});
rzp1.open();
VII) Verify Payment Status:
You can track the payment status from the Razorpay Dashboard, subscribe to the Webhook event or poll our APIs.
Once Order and Payment got created then same payment id will be created in Razorpay site and you will be able to view this payment details in Razorpay Dashboard.
Verify Payment Status from Dashboard:
Step 1: Log into the Dashboard and navigate to Transactions → Payments.
Step 2: Check if a payment_ID has been generated and note the status. In case of a successful payment, the status is marked as captured.

Now Payment is captured in Razorpay. Till now we have received only Payment Id. We need remaining payment information for storing into our data.
Lets say if payment got failed due to Bad Request then we need those information. To Store Razorpay data into our database, we need to configure Web hook.
VIII) Set up REST End Point to Receive Razorpay Webhook Response
For receiving Webhook Payload in our database we need to create Rest Endpoint in Oracle APEX like below Screenshot.
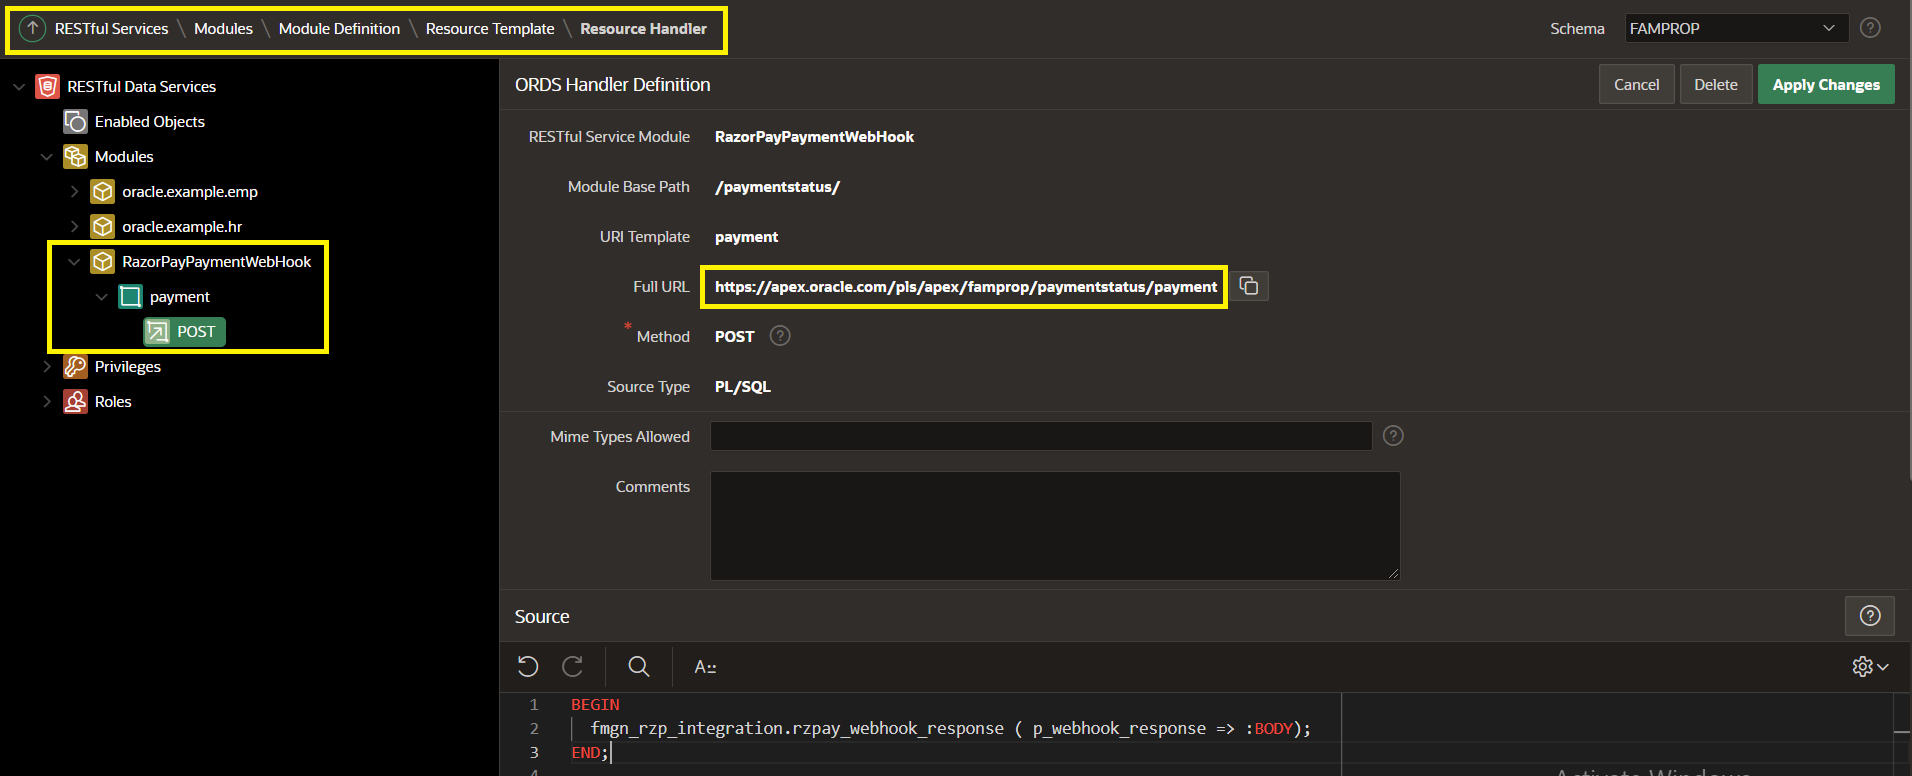
BEGIN
fmgn_rzp_integration.rzpay_webhook_response (p_webhook_response => :BODY);
END;
/
IX) Set up Razorpay Web hook:
What is Web hook?
Webhooks are basically user defined HTTP callbacks (or small code snippets linked to a web application) which are triggered by specific events. Whenever that trigger event occurs in the source site, the webhook sees the event, collects the data, and sends it to the URL specified by you in the form of an HTTP request.
Setup a Web Hook in Razorpay:
Navigate to My Account & Settings → Developer Controls. Click Add Webhooks if you are setting up a webhook for the first time or Edit Webhook to edit a previously saved webhook.
Enter the Webhook URL where you want to receive the webhook payload when an event is triggered.
When setting up the webhook, you have the option to enter a secret. Using this secret, you can validate that the webhook is from Razorpay. Entering the secret is optional but recommended. The secret should never be exposed anywhere publicly.
Webhook Setup:

Webhooks:

Webhook Details:

Once any payment event is triggered, then you will receive response in your Oracle Database with the help of Webhook.
Note: I have activated webhook only for payment events, You can activate it for order, invoice, fund account, payment, payment link events.
X) Test Cards:
You can test the payment flow using their test cards and you can find them by clicking this link.
Now, you can start accepting domestic and international payments from customers on your website using the Razorpay Payment Gateway.
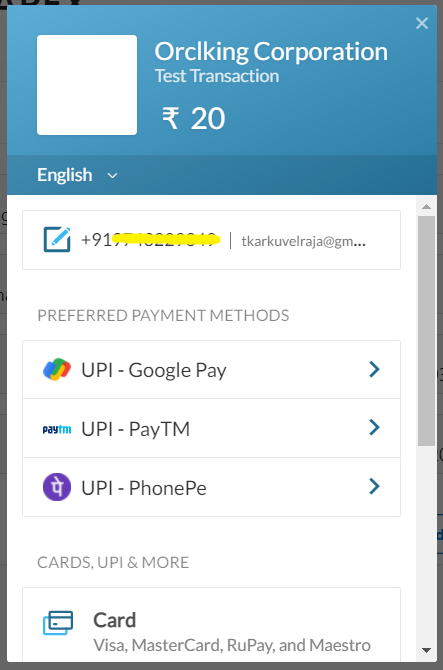
Razorpay has developed the Standard Checkout method and manages it. You can configure payment methods, orders, company logo and also select custom color based on your convenience.
Step 1: Enter payment details and click "Send" to invoke Razorpay payment gateway to process the payment.

1) Enter the card details (this depends on the flow you are testing)
2) Enter any future date as expiry date
3) Enter any random CCV
4) Click "Pay". A sample payment page is displayed.
OTP will be sent to the mobile which is linked to this card, when you are trying in Live Mode

Step 3: Enter random OTP and click "Submit" to complete the payment process.

Payment Successful!
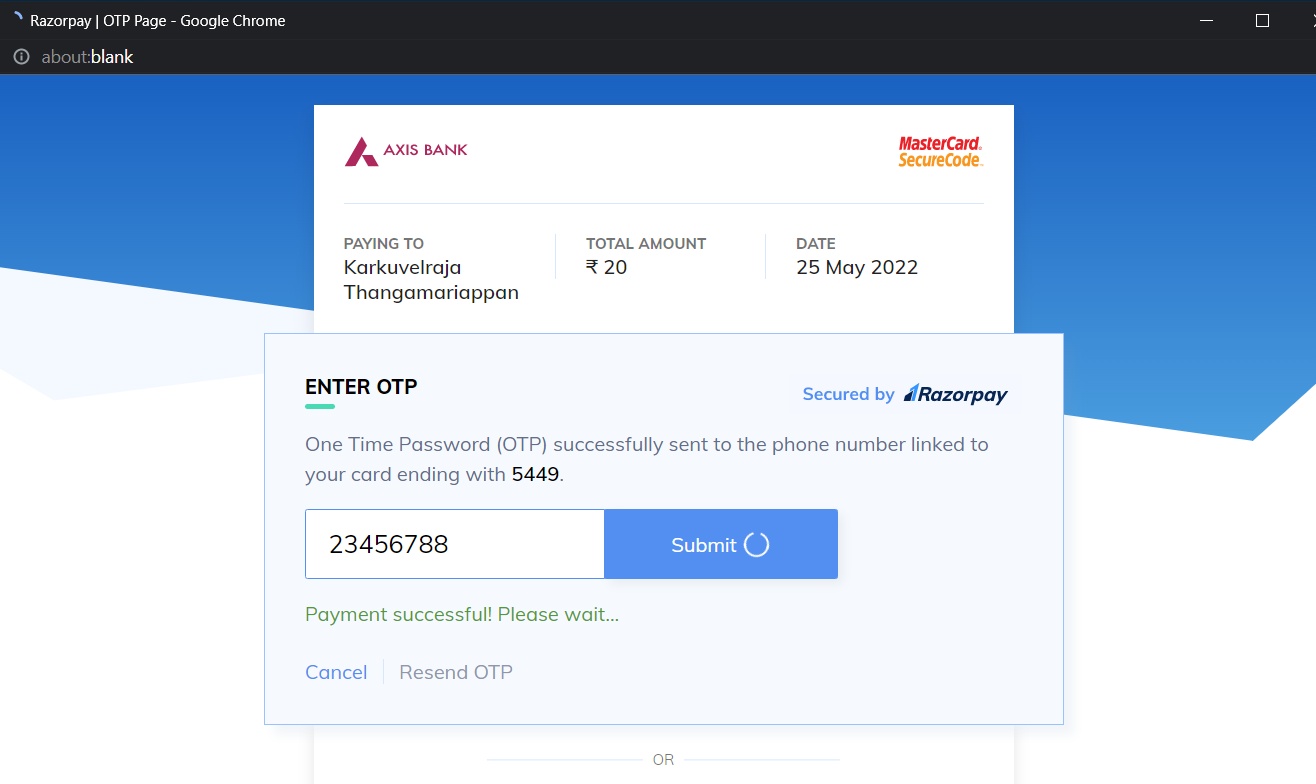
OTPs and Notifications will be sent to the registered mobile and email, when you are doing payments in Live Mode
Notifications:
You will be notified by email, when payment is failed/succeeded.
Payment Failure:

Payment Success:

Data Check:
Query below tables OR build nice reports, to verify/validate the data.
fmgn_rzp_orders - To view orders

fmgn_rzpay_payment_response - To view Razorpay payment response
fmgn_rzpay_payment_activities - To view Razorpay payment activities
LIVE MODE!
Step 1: Once you are done with the integration, you can generate Live Mode API Keys and replace them in the integration
Step 2: Kindly login to your merchant dashboard and complete the KYC (In order to make Live Transactions) by following the below steps:
1. Login to Merchant dashboard.
2. Go to My Account.
3. Click on View KYC Form.
4. Complete the KYC form.
That's it. Happy APEXing!
Nice, Thanks Raja (y)
ReplyDeleteExcellent post. Thank you for the webhooks part especially.
ReplyDeleteThank you for shedding light on Payment Gateway Integration with Oracle APEX! Your blog post was incredibly informative and well-structured. I appreciated the step-by-step guide and the practical tips you provided. Integrating payment gateways with Oracle APEX can indeed transform businesses, making online transactions secure and efficient. Your insights will undoubtedly help developers and businesses alike in navigating this process with confidence. Keep up the fantastic work, and I look forward to more insightful content from you!
ReplyDeleteAPI payment integration streamlines transactions by enabling secure and seamless online payments. Through well-documented APIs, businesses can connect their systems to payment gateways, offering customers diverse payment options. This integration enhances user experience, reduces friction during checkout, and ensures data privacy. APIs like Stripe, PayPal, and Square provide customizable solutions, empowering businesses to manage transactions efficiently while meeting the highest security standards. Embrace API payments to unlock the potential of e-commerce and digital financial interactions.
ReplyDeleteThanks and I have a dandy give: Where To Start Renovating House budgeting for home renovations
ReplyDeleteITIO Innovex’s Payment Gateway Software offers a secure, scalable, and customizable solution for businesses to manage online transactions seamlessly. It supports both white-label SaaS and source-code licensing, enabling full branding and feature control. The platform ensures PCI-DSS compliance, advanced fraud detection, and real-time analytics. With easy API integration, mobile and POS support, it fits diverse business needs. Ideal for fintechs and enterprises looking to launch their own branded payment gateway.
ReplyDeletevisit now: Payment gateway development
Thankyou!!
The importance of secure payment gateways cannot be overstated in eCommerce. Dhan Kubera stands out with its focus on reliability and protection. Choose Dhan Kubera for a safer payment experience!
ReplyDelete