
View List of Twilio Sent Messages in Oracle APEX using REST Data Source


Twilio Integration with Oracle APEX 22.1

The objective of this blog post is to show you how to list all Twilio sent messages in Oracle APEX using REST Data Source.

Before we get into the topic, let's take a look at the following link, which will help you to understand how you can get started with Twilio and use Twilio to send messages in Oracle APEX.

View List of Twilio Sent Messages

Below are steps involved to get this process done.
  1. Get Twilio Account SID, AUTH Token and Phone Number
  2. Get Twilio View Messages List API End Point
  3. Invoke Twilio View Messages List API with Postman
  4. Create a Web Credential
  5. Create a Remote Server
  6. Create a REST Data Source
  7. Create a Report to Show the REST Data created

I) Get Twilio Account SID, AUTH Token and Phone Number

Login Twilio with your credentials and It will take you to the console page where you could see your Twilio Account SID, AUTH Token and Phone Number.

II) Get Twilio View Messages List API End Point

Step 1: You can get the end point from Console: Login --> Explore Products --> API Explorer

Step 2: Select "Programmable SMS" from the dropdown

Step 3: Expand "Messages" and click "View Messages List", there under "Request " you can find the end point.

III) Invoke Twilio View Messages List API with Postman

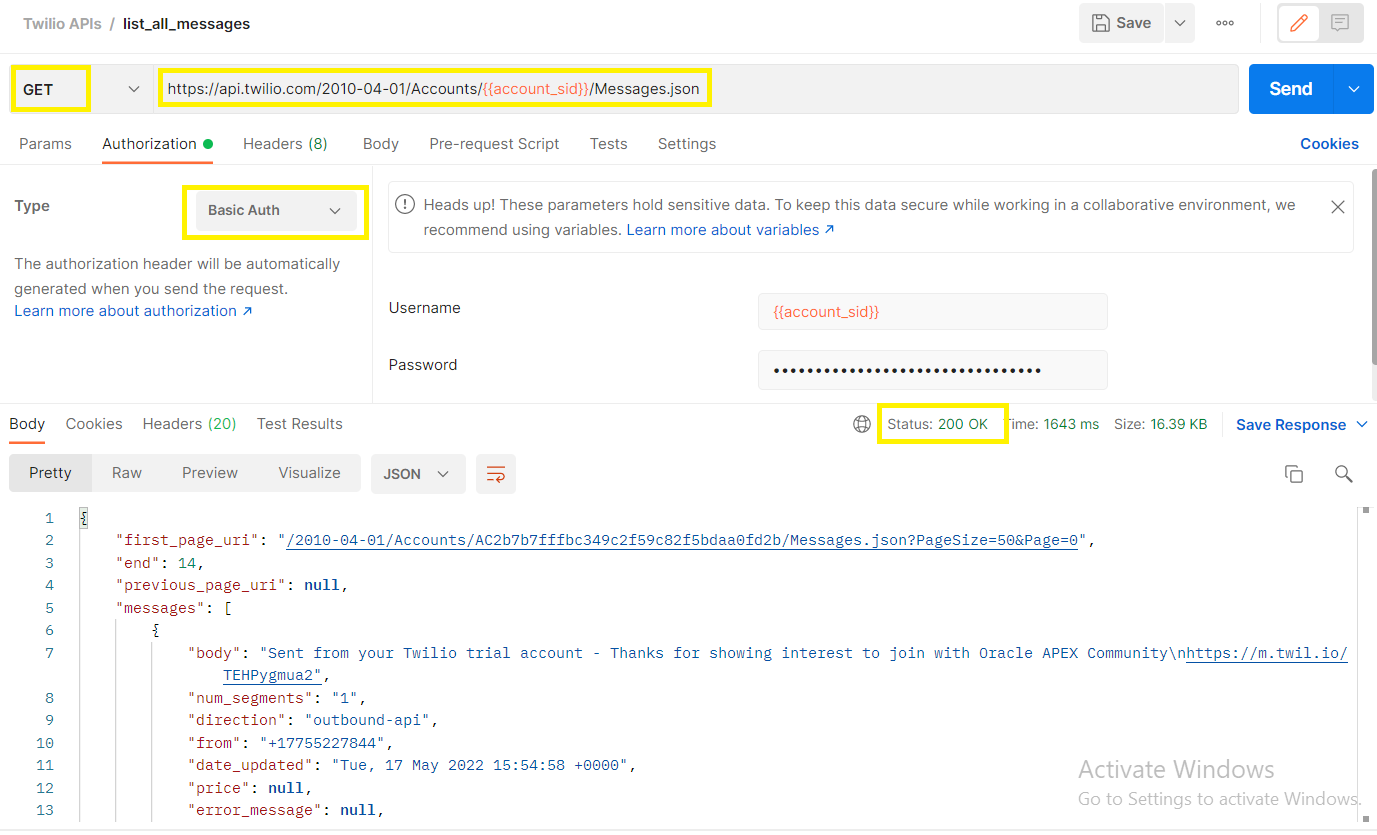
Step 1: Define Twilio Account Id as global variable (account_sid) in postman. Click "Environment Quick Look" to define global variables.


Step 2: Setup Authorization (Basic Authentication) and click "Send" button to call the API.


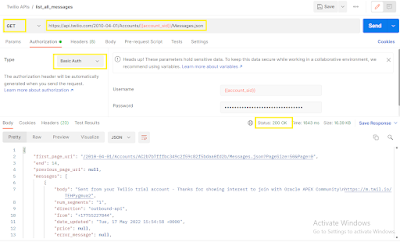
Note: When status code is between 200 and 299, then API is working fine.

IV) Create a Web Credential

Purpose of creating Web Credentials is to connect to REST Enabled SQL or other external REST services.

Step 1: Login Oracle APEX workspace with your credentials and it will take you to the workspace home page.

Step 2: You can create web credential from Workspace Utilities: App Builder --> Workspace Utilities --> All Workspace Utilities --> Web Credentials


Step 3: On the Web Credentials page, click Create and configure the attributes.


Step 4: Click Create and a new web credential (Credentials for View Twilio Messages) is created and listed under "Web Credentials".

V) Create a Remote Server

Purpose of creating Remoter Server is to manage remote server objects which used for REST Data Sources and Authentications.

The server information of a REST Data Source is stored as a Remote Server object. Remote Servers can be shared among multiple REST Data Sources. Changing Remote Server properties affects all REST Sources referencing that object. For example, by changing a Remote Server's Base URL, all associated REST Sources are moved from a test to a production system.

Step 1: You can create remote server from Workspace Utilities: App Builder --> Workspace Utilities --> All Workspace Utilities --> Remote Servers

Step 2: On the remote servers page, click Create and configure the attributes.


Step 3: Click Create and a new remote server (api-twilio-com-2010-04-01-accounts) is created and listed under "Remote Servers"


VI) Create a REST Data Source

REST Data Sources act as a reference to one or multiple external web services. A REST Data Source can contain one or many Operations which are the references to a concrete external web service.

Create a REST Data Source from Shared Components: App Builder --> Select an Application --> Shared Components (On the Application Home Page) --> REST Data Source (Under Data Sources)

Step 1: On the REST Data Source page, click Create and create REST Data Source.


Step 2: Create REST Data Source from scratch and click "Next".


Step 3: Fill general attributes and click "Next".


Step 4: Select remote server and click "Next".


Step 5: Select pagination type and click "Next".

Step 6: Select credentials and click "Discover".


Step 7: View REST data, profile, operations, response body and response header. Click "Create REST Data Source".


Step 8: new REST data source (View Twilio Messages) is created and listed under "REST Data Sources".

Web Credentials and Remote Servers can be created at the time of REST Data Source creation

API Success Response:

{

  "first_page_uri": "/2010-04-01/Accounts/AC2b7b7fffbc349c2f59c82f5bdaa0fd2b/Messages.json?PageSize=50&Page=0",

  "end": 10,

  "previous_page_uri": null,

  "messages": [

    {

      "body": "Sent from your Twilio trial account - Thanks for showing interest to join with Oracle APEX Community\nhttps://m.twil.io/HY8a0BbXU9",

      "num_segments": "1",

      "direction": "outbound-api",

      "from": "+17755227844",

      "date_updated": "Wed, 11 May 2022 12:36:11 +0000",

      "price": "-0.08950",

      "error_message": null,

      "uri": "/2010-04-01/Accounts/AC2b7b7fffbc349c2f59c82f5bdaa0fd2b/Messages/MM625c2e6a96f54f3ebde032c6c4389d83.json",

      "account_sid": "AC2b7b7fffbc349c2f59c82f5bdaa0fd2b",

      "num_media": "1",

      "to": "+971582036853",

      "date_created": "Wed, 11 May 2022 12:36:05 +0000",

      "status": "delivered",

      "sid": "MM625c2e6a96f54f3ebde032c6c4389d83",

      "date_sent": "Wed, 11 May 2022 12:36:06 +0000",

      "messaging_service_sid": null,

      "error_code": null,

      "price_unit": "USD",

      "api_version": "2010-04-01",

      "subresource_uris": {

        "media": "/2010-04-01/Accounts/AC2b7b7fffbc349c2f59c82f5bdaa0fd2b/Messages/MM625c2e6a96f54f3ebde032c6c4389d83/Media.json",

        "feedback": "/2010-04-01/Accounts/AC2b7b7fffbc349c2f59c82f5bdaa0fd2b/Messages/MM625c2e6a96f54f3ebde032c6c4389d83/Feedback.json"

      }

    }

  ],

  "uri": "/2010-04-01/Accounts/AC2b7b7fffbc349c2f59c82f5bdaa0fd2b/Messages.json?PageSize=50&Page=0",

  "page_size": 50,

  "start": 0,

  "next_page_uri": null,

  "page": 0

}

"messages" array has 21 fields, all will be fetched and you can check them from Shared Components --> REST Data Sources --> View Twilio Messages --> Data Profile

VII) Create a Report to Show REST Data Created

Step 1: Create a new blank page.

Step 2: Create a new region on the page (Position: Content Body). In the Property Editor, apply the following changes:

Under Identification:
     For Title - enter View Twilio Messages
     For Type- select Classical Report/Interactive Report
Under Source:
     For Location - REST Source
     For REST Source - select View Twilio Messages


Step 3: Report created and it will list all the Twilio sent messages.

Output:

The demo is here.

That's it. Happy APEXing!

Related Posts:

References/Credits:

Comments

Post a Comment

Popular posts from this blog

Printing Page Numbers in RTF Template [Oracle BI Publisher]

Here I am giving an example to print the page numbers dynamically in the RTF (Rich Text Format) template. Step 1:  Go to page footer and copy and paste the below script. Page |  <?fo:page-number?>  of  <?fo:page-number-citation:xdofo:lastpage-joinseq?> <fo:page-number> :   This is the object, which is used to represent the current page-number. <?fo:page-number-citation:xdofo:lastpage-joinseq?> :  This is the syntax, which is used to represent the total number of pages. Step 2:  Load the XML and preview the result. Output: That's it. References: fo:page-number Printing Page Number Code in Oracle XMLP RTF Template

Generating the report with APEX_DATA_EXPORT

With the APEX_DATA_EXPORT package, you are able to export data from Oracle Application Express in the following file types: PDF, XLSX, HTML, CSV, XML, and JSON. Step 1: Create a table and populate it with some sample records. CREATE TABLE emp   (     empno        NUMBER,     first_name   VARCHAR2(240),     last_name    VARCHAR2(240),     mgr          NUMBER,     deptno       NUMBER,     sal          NUMBER,     created_date TIMESTAMP (6),     comm         NUMBER,     hiredate     DATE,     JOB          VARCHAR2(240),     ename        VARCHAR2(240),     PRIMARY KEY (empno) USING INDEX ENABLE   ); /    INSERT INTO emp (empno, first_name, last_name, mgr,                   deptno, sal, created_date)         VALUES                 (1, 'Larry', 'Ellison', ,                  10, 5000, LOCALTIMESTAMP);   INSERT INTO emp (empno, first_name, last_name, mgr,                   deptno, sal, created_date)         VALUES                 (2, 'Juan', 'Juan', 1,  

Save Selected Interactive Grid Records into a Collection - Oracle APEX

Here I am giving an example to save selected interactive grid records into a oracle apex collection. Step 1: Create a new blank page. Note: Mine was page 20. You will need to update reference to " P20 " with your page number if it's different. Step 2: Create a new interactive grid report region to the page using below query. Set Static Id "EmpDetails" to the region. SELECT  *     FROM   ( SELECT  emp . empno ,                emp . ename ,                emp . JOB ,                dept . dname department ,                dept . loc  LOCATION ,                mgr . ename  manager ,                emp . hiredate ,                 nvl ( emp . sal , 0 )  salary ,                 nvl ( emp . comm , 0 )  commission            FROM  eba_demo_chart_emp emp ,                eba_demo_chart_dept dept ,                eba_demo_chart_emp mgr           WHERE  emp . deptno = dept . deptno             AND  emp . mgr      = mgr . empno  ( + )           ORDER   BY  emp . ename