To integrate Oracle APEX with Google Maps | Reverse Geocoding,
 I have followed below steps.
Step 1: Google API Key must be obtained. Get Google API Key.

Step 1: Google API Key must be obtained. Get Google API Key.
Step 2: Create a page.
Step 5: Add below js in Page HTML Header.
<!DOCTYPE html>
<html>
<head>
<meta name="viewport" content="initial-scale=1.0, user-scalable=no">
<meta charset="utf-8">
<title>Reverse Geocoding</title>
<style>
/* Always set the map height explicitly to define the size of the div
* element that contains the map. */
#map {
height: 100%;
}
/* Optional: Makes the sample page fill the window. */
html,
body {
height: 100%;
margin: 0;
padding: 0;
}
#floating-panel {
position: absolute;
top: 10px;
left: 25%;
z-index: 5;
background-color: #fff;
padding: 5px;
border: 1px solid #999;
text-align: center;
font-family: 'Roboto', 'sans-serif';
line-height: 30px;
padding-left: 10px;
}
#floating-panel {
position: absolute;
top: 5px;
left: 50%;
margin-left: -180px;
width: 350px;
z-index: 5;
background-color: #fff;
padding: 5px;
border: 1px solid #999;
}
#latlng {
width: 225px;
}
#floating-panel {
margin-top: 50px;
}
</style>
</head>
<body>
<div id="floating-panel">
<input id="latlng" type="text" value="40.714224,-73.961452">
<input id="submit" type="button" value="Reverse Geocode">
</div>
<div id="map"></div>
<script>
function initMap() {
var map = new google.maps.Map(document.getElementById('map'), {
zoom: 8,
center: {
lat: 40.731,
lng: -73.997
}
});
var geocoder = new google.maps.Geocoder;
var infowindow = new google.maps.InfoWindow;
document.getElementById('submit').addEventListener('click', function() {
geocodeLatLng(geocoder, map, infowindow);
});
}
function geocodeLatLng(geocoder, map, infowindow) {
var input = document.getElementById('latlng').value;
var latlngStr = input.split(',', 2);
var latlng = {
lat: parseFloat(latlngStr[0]),
lng: parseFloat(latlngStr[1])
};
geocoder.geocode({
'location': latlng
}, function(results, status) {
if (status === 'OK') {
if (results[0]) {
map.setZoom(11);
var marker = new google.maps.Marker({
position: latlng,
map: map
});
infowindow.setContent(results[0].formatted_address);
infowindow.open(map, marker);
} else {
window.alert('No results found');
}
} else {
window.alert('Geocoder failed due to: ' + status);
}
});
}
</script>
<script async defer src="https://maps.googleapis.com/maps/api/js?key=MY_GOOGLE_API_KEY&callback=initMap">
</script>
</body>
</html>
Note:
In the end of code, you can find link,
<script async defer src="https://maps.googleapis.com/maps/api/js?key=MY_GOOGLE_API_KEY&callback=initMap">
You must replace MY_GOOGLE_MAP_API_KEY with your valid Google MAP API Key.
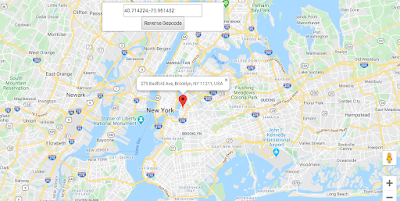
Output: The moment you click on "Reverse GeoCode" button, you will have an output as like below.

Faced Issues: I would like to share all the issues which i faced when i was integrating Oracle APEX with Google Maps.
References:
- https://developers.google.com/maps/documentation/javascript/tutorial
- https://developers.google.com/maps/documentation/javascript/error-messages
- https://developers.google.com/maps/documentation/geocoding/intro
- https://developers.google.com/maps/documentation/javascript/examples/geocoding-reverse
Related Posts:
- Integrating Oracle APEX with Google Maps | By Providing Multiple Latitude & Longitude
- Integrating Oracle APEX with Google Maps | By Providing Address/Location
- Integrating Oracle APEX with Google Maps | Find Your Location
- Integrating Oracle APEX with Google Maps | Get Address & Location by Providing Latitude and Longitude
Comments
Post a Comment